
一、sersync简述
sersync是利用inotify+rsync技术实现服务器数据关时同步的解决方案。inotify用于监控文件系统的事件变化;rsync作为本地及异地数据同步工具。
目前的同步程序版本inotify-tools,google开源的openduckbill都是基于脚本语言写的,其设计思路同样是采用inotify与rsync命令。
二、sersync的优点
1. c++编写,对linux系统文件产生的临时文件和重复的文件操作会进行过滤,在结合rsync同步时会减少运行时消耗的本地及网络资源,因此速度更快。
2. 配置简单,解压直接编辑即可。
3. 使用多线程同步(即可以并发同步多个不同文件),尤其在同步较大文件时,能够保存多个服务器状态实时同步。
4. 自带出错机制,通过失败队列对出错文件重新同步。可按预先设置,隔一段时间整体同步一次。
5. 自带crontab功能,只需在xml配置文件中开启配置即可。
三、sersync的工作原理图
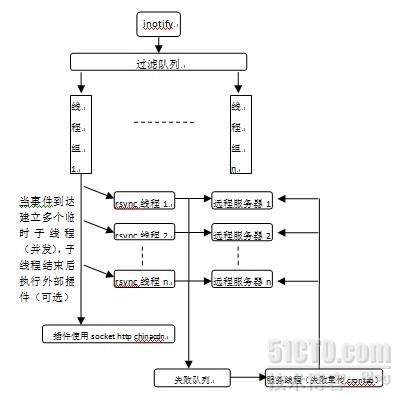
服务线程的作用:
首先处理同步失败的文件;每隔10个小时执行脚本一次,同时清空脚本;crontab功能,可以每隔一定时间将所有路径整体同步一次。
四、sersync的生产实例
测试环境:centos5.6 x86 sersync2.5 rsync2.6.8
实现M-sersync的代码目录实时同步到S1/S2-rsync服务器上。

S1/2-rsync服务器端配置:
1. 确定rsync包已安装好。
2. rsync的主要配置文件的设置(默认此文件不存在).
[root@S1-rsync ~]#vi /etc/rsyncd.conf #Rsync server #created by wyan 2012-9-19 ##rsyncd.conf start## uid = root gid = root use chroot = no max connections = 200 timeout = 600 pid file = /var/run/rsyncd.pid lock file = /var/run/rsync.lock log file = /var/log/rsyncd.log ignore errors read only = false list = false hosts allow = 192.168.40.94 hosts deny = 0.0.0.0/32 auth users = rsync_backup secrets file = /etc/rsync.password ##################################### [www] path = /data/www [blog] path = /data/blog
|
3. rsync同步的认证文件设置
[root@S1-rsync ~]# echo "rsync_backup:123456" >/etc/rsync.password ; # chmod 600 /etc/rsync.password 同步帐号密码设置
[root@S2-rsync ~]# rsync –daemon 启动rsync进程
补充:
# lsof -i:873 或netstat –natp |grep rsync 验证端口是否成功
# echo '/usr/bin/rsync --daemon'>/etc/rc.local 加入开机启动
# pkill rsync; rsync –daemon 重启rsync服务
M-sersync服务器端配置:
1. 手动rsync测试是否成功:
创建测试文件:
[root@ M-sersync sersync]#dd if=/dev/zero of=/data/www/10M.img count=100 bs=1024
[root@ M-sersync sersync]# dd if=/dev/zero of=/data/blog/1M.img count=10 bs=1024
M-sersync端手动推送:
[root@M-sersync sersync]# rsync -avzP /data/blog/ rsync_backup@192.168.40.144::blog --password-file=/etc/rsync.password
building file list ...
2 files to consider
./
1M.img
10240 100% 0.00kB/s 0:00:00 (xfer#1, to-check=0/2)
sent 130 bytes received 44 bytes 348.00 bytes/sec
total size is 10240 speedup is 58.85
[root@M-sersync sersync]# rsync -avzP /data/www/ rsync_backup@192.168.40.144::www --password-file=/etc/rsync.password
building file list ...
2 files to consider
./
10M.img
102400 100% 66.41MB/s 0:00:00 (xfer#1, to-check=0/2)
sent 220 bytes received 44 bytes 528.00 bytes/sec
total size is 102400 speedup is 387.88
[root@M-sersync ~]# rsync -avzP /data/www/ rsync_backup@192.168.40.147::www --password-file=/etc/rsync.password
building file list ...
2 files to consider
./
10M.img
102400 100% 66.41MB/s 0:00:00 (xfer#1, to-check=0/2)
sent 220 bytes received 44 bytes 176.00 bytes/sec
total size is 102400 speedup is 387.88
S1-rsync检查是否成功:
[root@S1-rsync ~]# tree /data/
/data/
|-- 2012-09-04.setest
| `-- aa
|-- 2012-09-07.log
|-- blog
| `-- 1M.img
|-- lost+found
`-- www
`-- 10M.img
5 directories, 3 files
S1-rsync测试结果同样已同步。
2. sersync配置
下载配置路径参考http://code.google.com/p/sersync/
[root@M-sersync local]# cd /usr/local/sersync/ 下载至此路径解压完会有个GNU-Linux-x86的32位sersync软件,规范下将其配置文件及命令和日志分别放入新建的bin,conf,blog目录下,如下:
[root@M-sersync sersync]# tree
.
|-- GNU-Linux-x86
| |-- confxml.xml
| `-- sersync2
|-- bin
| `-- sersync
|-- conf
| |-- confxml.xml
|-- logs
| |-- rsync_fail_log.sh
|-- sersync2.5_32bit_binary_stable_final.tar.gz
配置多个目录的同步可分开新建多个配置文件,如
|-- conf
| |-- bbs_confxml.xml
| |-- blog_confxml.xml
| |-- tmp
| | `-- confxml.xml
| `-- www_confxml.xml
|-- logs
| |-- bbs_rsync_fail_log.sh
| |-- blog_rsync_fail_log.sh
| |-- rsync_fail_log.sh
| `-- www_rsync_fail_log.sh
配置文件blog_confxml.xml:
[root@M-sersync sersync]# cat conf/blog_confxml.xml
<?xml version="1.0" encoding="ISO-8859-1"?>
<head version="2.5">
<host hostip="localhost" port="8008"></host>
<debug start="false"/>
<fileSystem xfs="false"/>
<filter start="false">
<exclude expression="(.*)\.svn"></exclude>
<exclude expression="(.*)\.gz"></exclude>
<exclude expression="^info/*"></exclude>
<exclude expression="^static/*"></exclude>
</filter>
<inotify>
<delete start="true"/>
<createFolder start="true"/>
<createFile start="false"/>
<closeWrite start="true"/>
<moveFrom start="true"/>
<moveTo start="true"/>
<attrib start="false"/>
<modify start="false"/>
</inotify>
<sersync>
<!-- ################################### -->
<localpath watch="/data/blog"> 本地同步路径
<remote ip="192.168.40.144" name="blog"/> 此blog为远程服务器的同步模块名
<remote ip="192.168.40.147" name="blog"/>
</localpath>
<!-- ################################### -->
<rsync>
<commonParams params="-aruz"/> 同步参数,同步帐号及密码文件,端口,时间参数
<auth start="true" users="rsync_backup" passwordfile="/etc/rsync.password"/>
<userDefinedPort start="false" port="874"/><!-- port=874 -->
<timeout start="true" time="100"/><!-- timeout=100 -->
<ssh start="false"/>
</rsync>
<failLog path="/usr/local/sersync/logs/blog_rsync_fail_log.sh" timeToExecute="60"/><!--default every 60mins execute once-->
<crontab start="false" schedule="600"><!--600mins-->
<crontabfilter start="false">
<exclude expression="*.php"></exclude>
<exclude expression="info/*"></exclude>
</crontabfilter>
</crontab>
<plugin start="false" name="command"/>
</sersync>
<plugin name="command">
<param prefix="/bin/sh" suffix="" ignoreError="true"/> <!--prefix /opt/tongbu/mmm.sh suffix-->
<filter start="false">
<include expression="(.*)\.php"/>
<include expression="(.*)\.sh"/>
</filter>
</plugin>
<plugin name="socket">
<localpath watch="/opt/tongbu">
<deshost ip="192.168.138.20" port="8009"/>
</localpath>
</plugin>
<plugin name="refreshCDN">
<localpath watch="/data0/htdocs/cms.xoyo.com/site/">
<cdninfo domainname="ccms.chinacache.com" port="80" username="xxxx" passwd="xxxx"/>
<sendurl base="http://pic.xoyo.com/cms"/>
<regexurl regex="false" match="cms.xoyo.com/site([/a-zA-Z0-9]*).xoyo.com/p_w_picpaths"/>
</localpath>
</plugin>
</head>
配置文件www_confxml.xml,同上参数修改:
…………
<localpath watch="/data/www">
<remote ip="192.168.40.144" name="www"/>
<remote ip="192.168.40.147" name="www"/>
</localpath>
<!-- ################################### -->
<rsync>
<commonParams params="-aruz"/>
<auth start="true" users="rsync_backup" passwordfile="/etc/rsync.password"/>
<userDefinedPort start="false" port="874"/><!-- port=874 -->
<timeout start="true" time="100"/><!-- timeout=100 -->
<ssh start="false"/>
</rsync>
<failLog path="/usr/local/sersync/logs/www_rsync_fail_log.sh" timeToExecute="60"/><!--default every 60mins execute once-->
……….
启动服务:
[root@M-sersync bin]# PATH=$PATH:/usr/local/sersync/bin sersync命令路径加入到环境变量
启动多个服务:
[root@M-sersync bin]# sersync -r -d -o /usr/local/sersync/conf/www_confxml.xml
[root@M-sersync bin]# sersync -r -d -o /usr/local/sersync/conf/blog_confxml.xml
set the system param
execute锛歟cho 50000000 > /proc/sys/fs/inotify/max_user_watches
execute锛歟cho 327679 > /proc/sys/fs/inotify/max_queued_events
parse the command param
option: -r rsync all the local files to the remote servers before the sersync work
option: -d run as a daemon
option: -o config xml name锛? /usr/local/sersync/conf/blog_confxml.xml
daemon thread num: 10
parse xml config file
host ip : localhost host port: 8008
daemon start锛宻ersync run behind the console
use rsync password-file :
user is rsync_backup
passwordfile is /etc/rsync.password
config xml parse success
please set /etc/rsyncd.conf max connections=0 Manually
sersync working thread 12 = 1(primary thread) + 1(fail retry thread) + 10(daemon sub threads)
Max threads numbers is: 32 = 12(Thread pool nums) + 20(Sub threads)
please according your cpu 锛寀se -n param to adjust the cpu rate
------------------------------------------
rsync the directory recursivly to the remote servers once
working please wait...
execute command: cd /data/blog && rsync -aruz -R --delete ./ --timeout=100 rsync_backup@192.168.40.144::blog --password-file=/etc/rsync.password >/dev/null 2>&1
run the sersync:
watch path is: /data/blog
[root@M-sersync blog]# ps -ef |grep sersync |grep -v grep
root 18860 1 4 16:38 ? 00:01:58 sersync -r -d –o /usr/local/sersync/conf/blog_confxml.xml
root 18920 1 0 17:07 ? 00:00:00 sersync -r -d -o /usr/local/sersync/conf/www_confxml.xml
加入到rc.local开机启动,不须加-r 参数,避免整体再次同步:
[root@M-sersync bin]# echo -e ‘/usr/local/bin/sersync -d -o /usr/local/sersync/conf/blog_confxml.xml\n /usr/local/bin/sersync -d -o /usr/local/sersync/conf/www_confxml.xml’>>/etc/rc.local
3. 写入1000个文件批量同步测试:
[root@M-sersync blog]# for n in `seq 1000`;do echo aaaa>$n.txt;done M-sersync端写入1000个文件
[root@M-sersync blog]# tree .
……
|-- 995.txt
|-- 996.txt
|-- 997.txt
|-- 998.txt
|-- 999.txt
`-- test
[root@M-sersync blog]# tail -f /usr/local/sersync/logs/blog_rsync_fail_log.sh 查看日志文件
#errno -1
cd /data/blog && rsync -aruz -R --timeout=100 "./996.txt" rsync_backup@192.168.40.144::blog --password-file=/etc/rsync.password >/dev/null 2>&1
#errno -1
cd /data/blog && rsync -aruz -R --timeout=100 "./997.txt" rsync_backup@192.168.40.144::blog --password-file=/etc/rsync.password >/dev/null 2>&1
#errno -1
cd /data/blog && rsync -aruz -R --timeout=100 "./998.txt" rsync_backup@192.168.40.144::blog --password-file=/etc/rsync.password >/dev/null 2>&1
[root@s1-rsync data]# tree blog/ S1-rsync端查看同步情况
……
|-- 95.txt
|-- 96.txt
|-- 97.txt
|-- 98.txt
|-- 99.txt
`-- test
0 directories, 809 files
4. sersync参数说明:
./sersync -d 运行一个进程
./sersync -r 首先进行一次整体同步,写到开机启动时不需要此参数
./sersync -o 指定配置文件
./sersync -n num 指定sersync 默认线程数
./sersync -m 不进行同步,只运行插件
补充:
错误提示
@ERROR: auth failed on module blog
rsync error: error starting client-server protocol (code 5) at main.c(1296) [sender=2.6.8]
表示远程服务器的认证文件用户名密码错误或者认证文件非600权限。


