
Sersync多文件夹同步文档
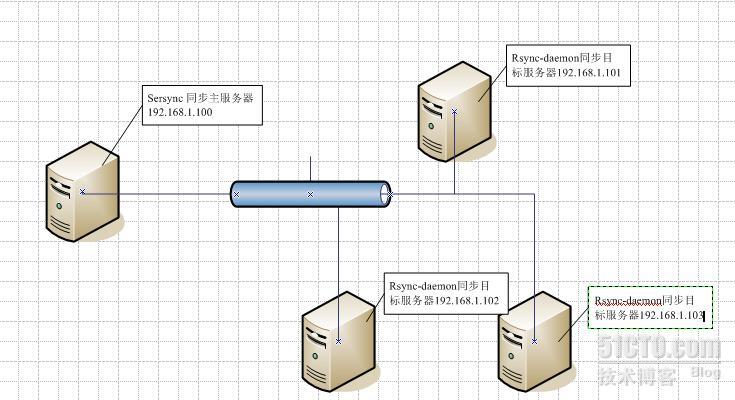
同步主服务器 192.168.1.100 同步目标服务器 192.168.1.101 192.168.1.102 192.168.1.103
如图所示,需要在同步主服务器上配置sersync,在同步目标服务器配置rsync,并在目标服务器开启rsync守候进程,这样在主服务器产生的文件,就会被sersync实时同步到多个目标服务器。在centos系统下默认已经安装了rsync,只需进行配置,并开启rsync守候进程即可。
首先安装或更新 xinted 和 rsync
Yum install xinted
Yum install rsync
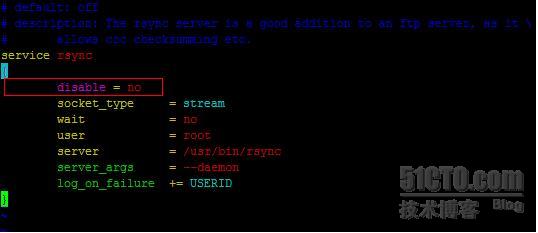
开启rsync
vim /etc/xinetd.d/rsync
配置同步目标服务器rsync
在多台目标服务器上配置如下:
vi /etc/rsyncd.conf
id=root
gid=root
max connections=36000
use chroot=no
log file=/var/log/rsyncd.log
pid file=/var/run/rsyncd.pid
lock file=/var/run/rsyncd.lock
[test]
path=/opt/test
comment = test
ignore errors = yes
read only = no
hosts allow = 192.168.1.100/24
hosts deny = *
[wujia]
path=/opt/wujia
comment = wujia
ignore errors = yes
read only = no
hosts allow = 192.168.1.100/24
hosts deny = *
上面配置文件,表明允许主服务器(假设ip为192.168.0.100)访问,rsync同步模块名为[test],将同步过来的文件放入path指定的目录/opt/test。
如果有多台从服务器,则每一台都需要进行类似的配置。
配置好之后,
使用如下命令,
重启xinted 服务
Service xinted restart
开启rsync守护进程:
rsync --daemon
在主服务器上安装配置sersync
在google code下载sersync的可执行文件版本,里面有配置文件与可执行文件,这里用sersync2.5进行说明,新版本配置形式类似。
同步两个文件夹需要创建两个sersync程序文件夹 例如:test1 test2
tar -xvf sersync.tar.gz
cd GNU-Linux-x86/
vi confxml.xml
test1修改如下部分:
1 <sersync>
2 <localpath watch="/opt/test">
3 <remote ip="192.168.1.101" name="test"/>
4 <remote ip="192.168.1.102" name="test"/>
5 <remote ip="192.168.1.103" name="test"/>
5 </localpath>
表明要将主服务器上本地的/opt/test 路径下的文件,同步到远程服务器 192.168.1.101, 192.168.1.102,192.168.1.103上的tongbu1 模块。
Test2 修改如下部分
1 <sersync>
2 <localpath watch="/opt/wujia">
3 <remote ip="192.168.1.101" name="wujia"/>
4 <remote ip="192.168.1.102" name="wujia"/>
5 <remote ip="192.168.1.103" name="wujia"/>
5 </localpath>
[root@localhost test1]# ls
confxml.xml sersync2
[root@localhost test1]# ./sersync2 -r -d -o confxml.xml
同步/opt/wujia的操作和结果
[root@localhost ~]# cd test1
[root@localhost test1]# ls
confxml.xml sersync2
[root@localhost test1]# ./sersync2 -r -d -o confxml.xml
set the system param
executecho 50000000 > /proc/sys/fs/inotify/max_user_watches
executecho 327679 > /proc/sys/fs/inotify/max_queued_events
parse the command param
option: -r rsync all the local files to the remote servers before the sersync work
option: -d run as a daemon
option: -o config xml name锛 confxml.xml
daemon thread num: 10
parse xml config file
host ip : localhost host port: 8008
daemon startersync run behind the console
config xml parse success
please set /etc/rsyncd.conf max connections=0 Manually
sersync working thread 12 = 1(primary thread) + 1(fail retry thread) + 10(daemon sub threads)
Max threads numbers is: 22 = 12(Thread pool nums) + 10(Sub threads)
please according your cpu se -n param to adjust the cpu rate
------------------------------------------
rsync the directory recursivly to the remote servers once
working please wait...
execute command: cd /opt/wujia && rsync -artuz -R --delete ./ 192.168.1.100::wujia >/dev/null 2>&1
run the sersync:
watch path is: /opt/wujia
同步/opt/test的操作和结果
[root@localhost ~]# cd test2
[root@localhost test2]# ls
confxml.xml sersync2
[root@localhost test2]# ./sersync2 -r -d -o confxml.xml
set the system param
executecho 50000000 > /proc/sys/fs/inotify/max_user_watches
executecho 327679 > /proc/sys/fs/inotify/max_queued_events
parse the command param
option: -r rsync all the local files to the remote servers before the sersync work
option: -d run as a daemon
option: -o config xml name confxml.xml
daemon thread num: 10
parse xml config file
host ip : localhost host port: 8008
daemon start ersync run behind the console
config xml parse success
please set /etc/rsyncd.conf max connections=0 Manually
sersync working thread 12 = 1(primary thread) + 1(fail retry thread) + 10(daemon sub threads)
Max threads numbers is: 22 = 12(Thread pool nums) + 10(Sub threads)
please according your cpu se -n param to adjust the cpu rate
------------------------------------------
rsync the directory recursivly to the remote servers once
working please wait...
execute command: cd /opt/test && rsync -artuz -R --delete ./ 192.168.1.100::test >/dev/null 2>&1
run the sersync:
watch path is: /opt/test
注意事项:
1.confxml.xml在另一个文件夹中一定要改名,如图实例:con.xml
2.对于大多数应用,可以尝试把createFile(监控文件事件选项)设置为false来提高性能,减少 rsync通讯。因为拷贝文件到监控目录会产生create事件与close_write事件,所以如果关闭create事件,只监控文件拷贝结束时的事 件close_write,同样可以实现文件完整同步。
注意:强将createFolder保持为true,如果将createFolder设为false,则不会对产生的目录进行监控,该目录下的子文件与子目录也不会被监控。所以除非特殊需要,请开启。
默认情况下对创建文件(目录)事件与删除文件(目录)事件都进行监控,如果项目中不需要删除远程目标服务器的文件(目录),则可以将delete 参数设置为false,则不对删除事件进行监控。


